

(DSLR/Bridge cameras)
This page explains the basics of exposure to help you choose an appropriate shooting mode
Exposure basics
Image exposure is independently affected by three camera settings:
- aperture
- shutter speed
- ISO speed
Aperture and shutter speed control how much light reaches the camera sensor by determining how much light enters the lens and for how long the sensor is exposed to that light. ISO speed electronically adjusts the sensor sensitivity, large ISO numbers are more sensitive than low ISO numbers.
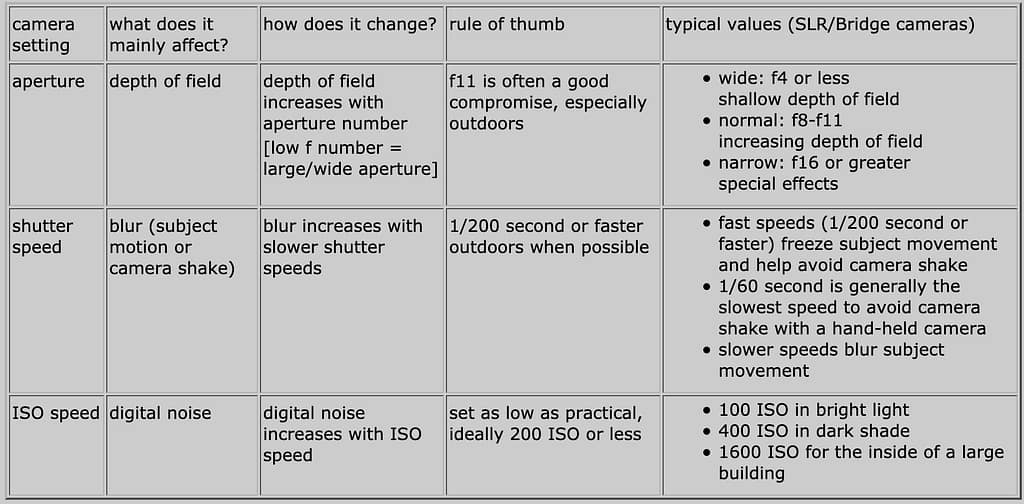
The table shows typical values. Since optimal settings are camera and lens specific, these values can give only general guidance. Over time, for your camera and your way of taking photos, you will develop a ‘gut feel’ for what works and what doesn’t.
In many lighting situations, choice of settings for ‘correct’ exposure will be a compromise.
For more background, see camera exposure [new window]
Depth of Field
It’s important to understand the term ‘depth of field’, which is the distance between the nearest and farthest objects in acceptably sharp focus. For more see depth of field [new window]
Summary of exposure settings and typical values
Shooting modes
Full Auto is a fail-safe initial choice, often resulting in good photos, but you cannot change settings if you want to be creative.
Provided you have a basic understanding of exposure, we suggest you experiment with other modes (examples below).
For all modes, the first step is to set a suitable ISO, but be prepared to change that later if necessary. Then choose your mode and use the camera dial or menu to adjust the setting.
Advantages and disadvantages of selected shooting modes
| Mode | Description | Suitable subjects | Advantages | Disadvantages |
|---|---|---|---|---|
| P / Auto | Program Auto Exposure | most | Selects a good compromise between shutter speed and aperture. You can easily change the aperture/shutter speed combination whilst maintaining correct exposure. | As shutter speed and aperture both change when you alter the setting, you need a feel for the relationship between them. Usually sets falsh to auto so it may go off when you don’t want it to. |
| Av / A | Aperture Priority | landscapes any photo where you wish to control depth of field | Easy to understand – set the aperture and let the camera set shutter speed. By setting the aperture you can control the depth of field, large apertures (small f No’s) equal shallow depth of filed and vice versa. | Shutter speed can easily become too slow, especially indoors. |
| Tv / S | Shutter Priority | Moving objects Objects requiring long exposures. | Easy to understand – set the shutter speed and let the camera work out the aperture. A fast shutter speed will ‘Freeze’ a moving object whereas a slow shutter speed can ‘blur’ moving objects. Long shutter speeds may be required for low light conditions and for avoiding very high ISO settings that might reduce image quality. As a rule of thumb, unless you are using a tripod do not set the shutter speed less than ‘1’ over the camera lens focal length. | The automatically selected aperture may be inappropriate eg; wrong depth of field. Slow shutter speeds can result in ‘camera shake’ particularly with ‘long’ lens’s. |
For other modes, read your camera manual or see:
- aperture priority and shutter priority exposure lesson 1 [new window]
- List of digital camera modes [new window]